Twist Drill Talk (Part 1) by Tom Smith
This is not intended to be a PhD dissertation. Instead it is intended to help the garage mechanic understand a few things about 2-flute twist drills to make his/her life a little easier.
Drills are one of the hardest working of all the machine tools. They have an amazing ability to remove metal in large quantity very quickly. At the same time being one of the least respected tools.
Drills are commonly used and abused then tossed aside or at best placed back in an index box.. When next called upon to make a hole they are verbally abused in ways some times hardly imaginable because the drill just does not work as expected. It just has to be a bad drill (bit). Granted there are some cheap (worthless) drills on the market, but the fault generally resides with the user.
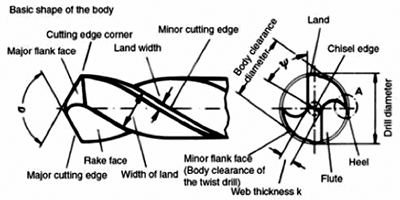
Figure 1: Terms and diagram of drill bit parts
A drill is a complex tool. First it has to provide a way to start and continue a hole where there was none to begin with. That is the job of the chisel edge. This is the edge at the tip of the drill where the web is. The chisel edge does not cut, it pushes material aside so the cutting can tale place.
Next is the major cutting edge, which cuts and lifts material out of the hole.
Then the lands begin their job of regulating the depth of cut for each revolution and protecting the cutting edge.
As the drill starts to reach the full diameter of cut the margins begin to make contact. The margins cut the edge or diameter of the drilled hole.
The margin relief is there to reduce friction and reduce binding on chips.
The spiral flutes are to provide a way to evacuate the removed material. But their most important function is to transfer the twist force of the drill motor to the drill cutting lips or edges.
Drill diameter is measured over the margins. Usually a new drill can be measured over the shank also.
If more control of the hole is desired first a center punch should be used. First use the one with the steeper angle (center of fig 2) for better control in locating the hole position. Then use one that best fits the size of the drill being used.
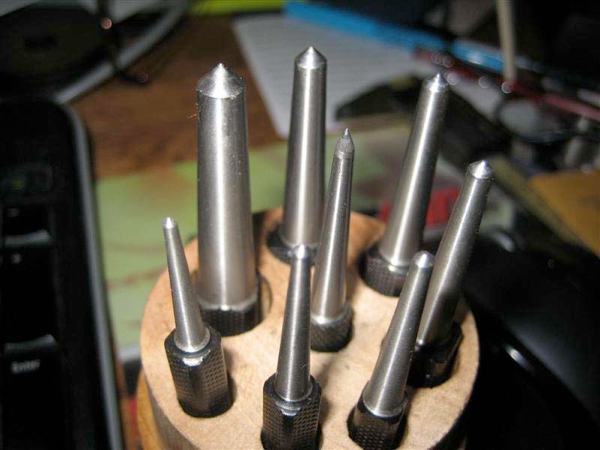
Figure 2: Center punches in assorted sizes, to prevent drill wandering
Symptoms can help you understand why your drill is not working as expected.
- Is it turning the right direction? Remember, although not as common as right- hand twist drills there are left-hand twist drills also.
- Is it getting hot and not cutting? See #1 before going on.
- One or both cutting edges may be dull.
- The drill may be riding on one or both lands causing friction and not allowing the cutting edges to make a cut.
- Are you using lubricant?
- If you are drilling deep holes in wood, especially hardwood, are you doing it in steps so the drill can clear the flutes?
- Are the RPMs too high?
- Are the cutting edges chipping out or is the chip too thick? Would include tending to spiral through the bottom of a hole or through sheet metal with out cleaning the hole out.
- Is one or both lands ground too steep?
- Are one or both lands ground at the correct angle but ground flat instead of a helix curve?
- Is the drill squealing? A sign of too high RPMs and/or lack of lube.
- Is the drill chattering? A sign of too low RPMs
Things to look for to know the condition of a drill
The cutting edges should be equal length and equal angle. 118 degrees (59 + 59) Fig 3 is the most common angle and well suited to mild steel. 135 degrees would be better for stainless steel and 120 degrees would be for tool steel or prehardened 4140 chrome moly.
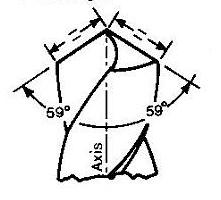
Figure 3: Cutting edge angles on typical twist drill bit
The relief of the lands is very important and often ignored. The first rule of the lands is this; the lands begin having relief immediately after the cutting edge and that relief continues all the way to the heel; see Fig 4.
The second rule of the lands is that they should be a in a spiral helix shape. In other words, when looking at the margin edge it should follow like the thread on a screw fig 3 and fig 4. The land should never look like fig 5. In fig 5 the cutting edge has very little support and will easily chip out. In fig 5 the cutting edge will also dig into the material very aggressively. And the edge in fig 5 will get hot in very little time because there is less material behind it to take away the heat.
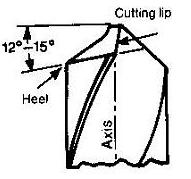
Figure 4: Drill bit lands relief
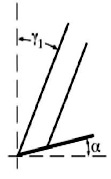
Figure 5: Drill bit
cutting edge
(incorrect)
A pilot drill should be chosen to match the thickness of the web. For example, if a pilot drill half the diameter of the final drill is used it will allow the final drill to wallow around and not guide it. Also, the cutting edges will be making contact at their center and tend to chip the edges.
Grinding the margins can cause the drill to cut undersize.
Grinding one edge longer then the other can cause the drill to cut oversize. Generally a flatter point for harder materials and a sharper point for softer materials.


I didn't know the exact purpose of all the facets.
Doctor with respect to keeping good quality twist drills sharp?
Want to leave a comment or ask the owner a question?
Sign in or register a new account — it's free